LAN (wired internet) under Windows 10

Requirements for use

  • You have a notebook with a LAN connection.
  • You are logged on to your system as an administrator.
  • Your notebook must automatically obtain an IP address (DHCP).

Step 1: Open Services

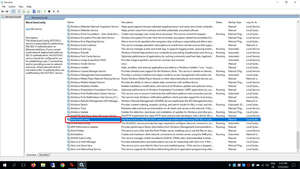
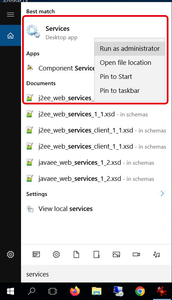
Open the Desktop app Services (services.msc).

Open Services

Step 2: Configure the service

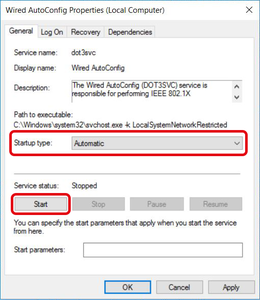
Please double-click on the "Wired AutoConfig" service.

v

Step 3: Change the start type of the automatic configuration (wired) and start the service

Please select “Automatic” as the startup type and then click on “Start” in the lower area.

 “Apply” the settings and click “OK”. Then close the service management.

Set startup type on automa

Step 4: Open Network & Internet settings

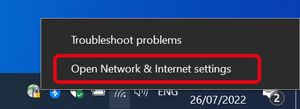
Please open the “Network & Internet settings”, e.g. by right-clicking on the network symbol in the toolbar and selecting "Open Network & Internet settings". Alternativ you may open the status page of  "Network & Internet" in the Windows Settings.

Open Network & Internet settings

Step 5: Go to adapter options

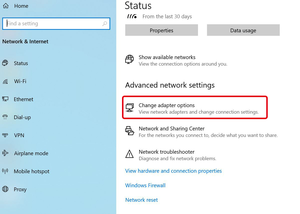
Click on "Change adapter options"

Change adapter options

Step 6: Select Properties

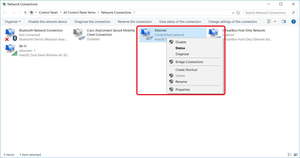
Right-click on "Ethernet" connection and select "Properties".

Select Ethernet Properties

Step 7: Make settings for the authentication

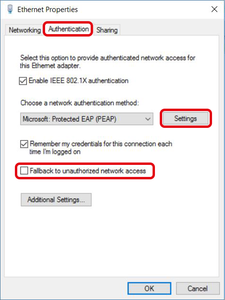
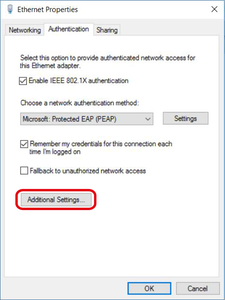
Please select the "authentication" tab. Then please make sure that "Enable IEEE 802.1X authentication" is checked. Then remove the check mark next to “Fallback to unauthorized network access”.

Select “Microsoft: Protected EAP (PEAP)” as the network authentication method and then click “Settings”.


Note: If you do not see the “Authentication” tab, the service as described in step 3 was not started successfully.

Set Authentication

Step 8: Make security settings

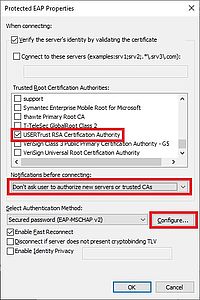
Please select the “USERTrust RSA Certification Authority” certificate from the “Trusted Root Certification Authorities”.
Then select under the root certificates - "Don't ask user to authorize new servers or trusted CAs".
Complete the step by clicking on "Configure ...".


Make security settings

Step 9: Change EAP-MSCHAPv2 settings

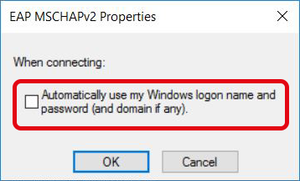
Please make sure that the tick is not set and confirm with "OK" (2x).

Check if not checked

Step 10: Selecting Additional Settings

Close “Protected EAP Properties” with “OK” and open “Additional Settings…” in the authentication tab.

Select Additional Settings

Step 11: Enter credentials

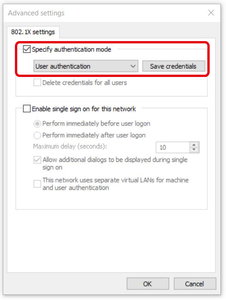
Under “Specify authentication mode” select “User authentication”. Then click on “Save credentials”.

Set user authentication

Step 12: Save credentials

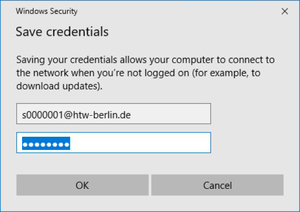
Please enter your user credentials. The "user name" and the "password" correspond to those of your HTW account. Please note that you add the extension “@ htw-berlin.de” to your user name (e.g. s0000001@htw-berlin.de or amuster@htw-berlin.de).

Confirm the entry as well as the two still open windows with "OK".
Save credentials