Printing from a Windows system
Requirements
- You have a PC/notebook with a Microsoft Windows operating system and are logged in as administrator
- You know your "printer user name". This manual describes how to find out your "printer user name"
- You are in the network (e.g. WLAN) of the HTW Berlin. Outside the HTW Berlin, print jobs can only be sent to public printers via VPN.
Step 1: Download printer driver
Please download the printer driver "Generic Plus PCL6 Printer Driver" from the Canon website:
Download-Link (External access to the Canon.de website)
This is an *.exe file. After the download, double-click on it. An unpacking process will start immediately which will create a new folder in your download folder with the name "Generic_Plus_PCL6_Driver_V130_32_64_00" (as an example). You do not need to do anything else (no setup or similar)! Unpacking the drivers is sufficient. Just remember where the folder was created and then continue with step 2 of this manual.
Step 2: Add new printer
Go to the "Devices and Printers" management in Windows. You can use e.g. the Windows search bar for this purpose. Then click on "Add printer".

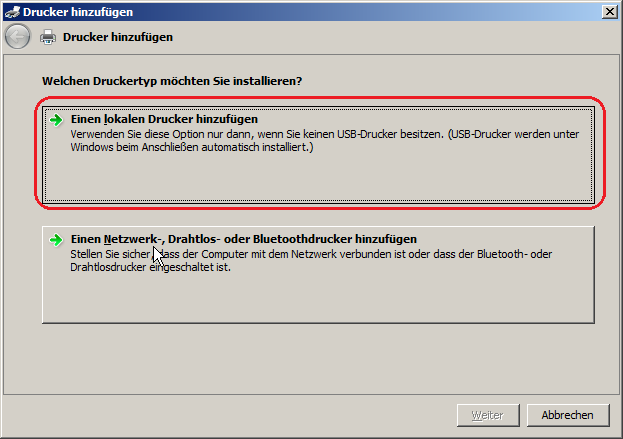
Step 3: Add local printer
Select "Add a local printer".
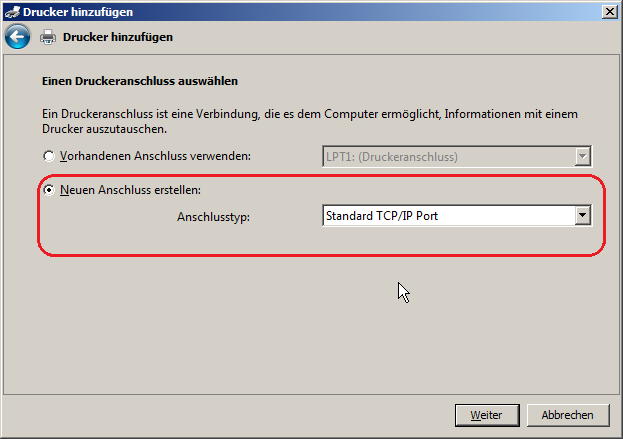
Step 4: Create new connection / TCP/IP port
Select "Create New Port" and then select "Standard TCP/IP Port" as the port type.
Step 5: Set hostname
Enter the server: canon-ufs.rz.htw-berlin.de in the "Host name or IP address" field. The port name can have the same name.

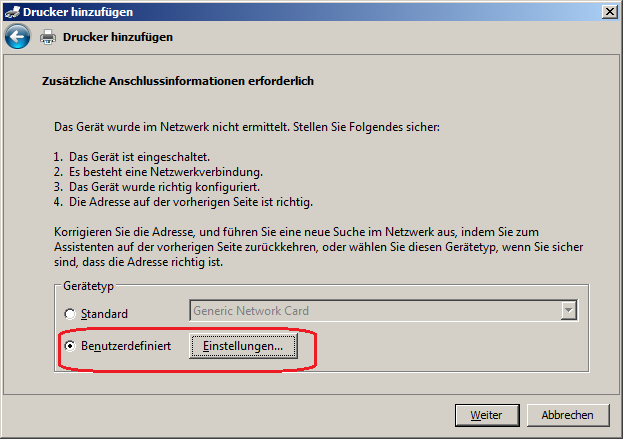
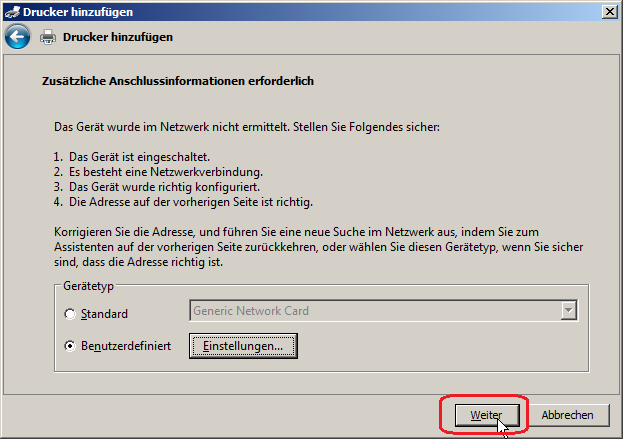
Step 6: Connection information
Select "Custom" and then "Settings...".
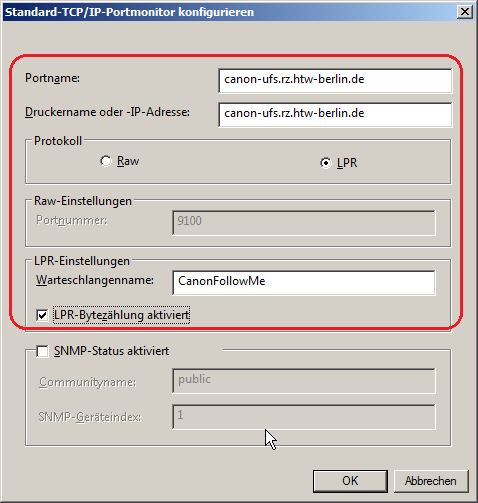
Step 7: Protocol and LPR settings
Select "LPR" as protocol, enter "CanonFollowMe" as queue name and check the box "LPR byte counting enabled". Then confirm with "OK".
Step 8: Confirm mask
Confirm the settings made with "Next".
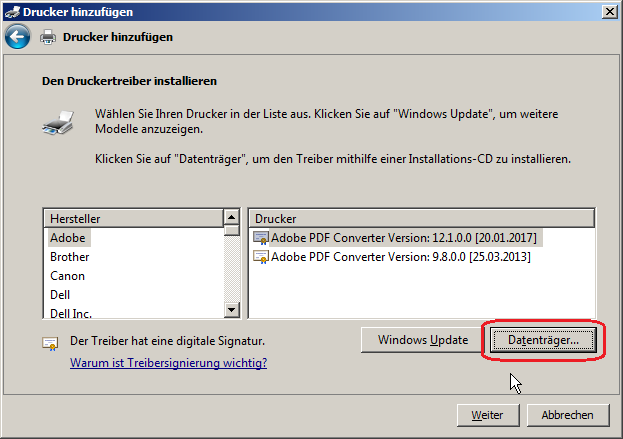
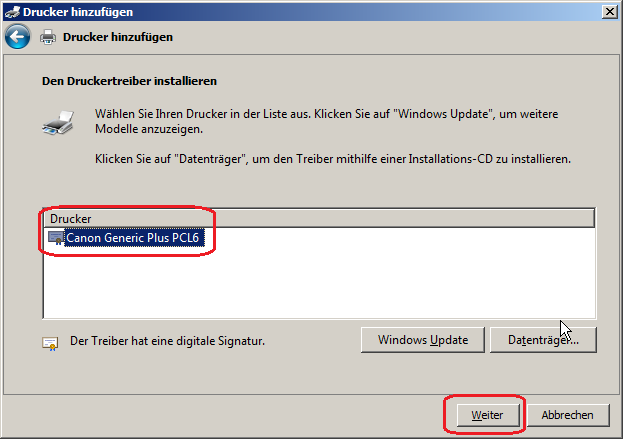
Step 9: Select printer driver
In the next window you will be asked for the printer drivers. Select "Disk..." and navigate in the opening file explorer window to the printer drivers you downloaded in "Step 1" of this manual.
Usually you will find the drivers in your download directory. For 64-bit systems this is e.g:
C:\Benutzer\[IHR-NAME]\Downloads\Generic_Plus_PCL6_Driver_V130_32_64_00\x64\Driver
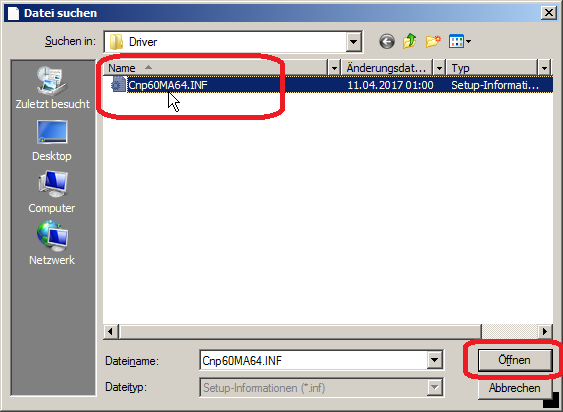
Step 10: Select driver
Select the file "Cnp60MA64.INF" in the folder "Driver" and confirm with "Open".
Step 11: Confirm printer driver
Confirm that you want to use the printer driver "Canon Generic Plus PCL6" with "Next".
Step 12: Set printer name
Enter "CanonFollowMe" as printer name and confirm with "Next".

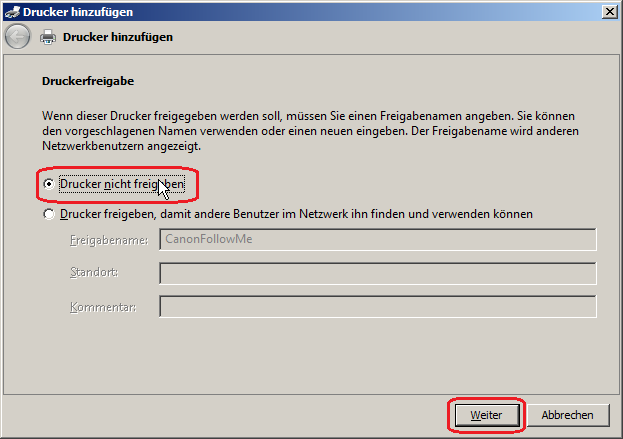
Step 13: Set share
Specify that you do not share the printer and confirm with "Next".
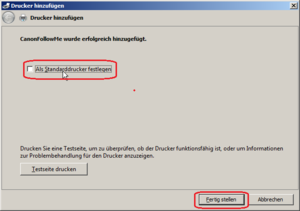
Step 14: Set default printer
Choose whether it should become your default printer.
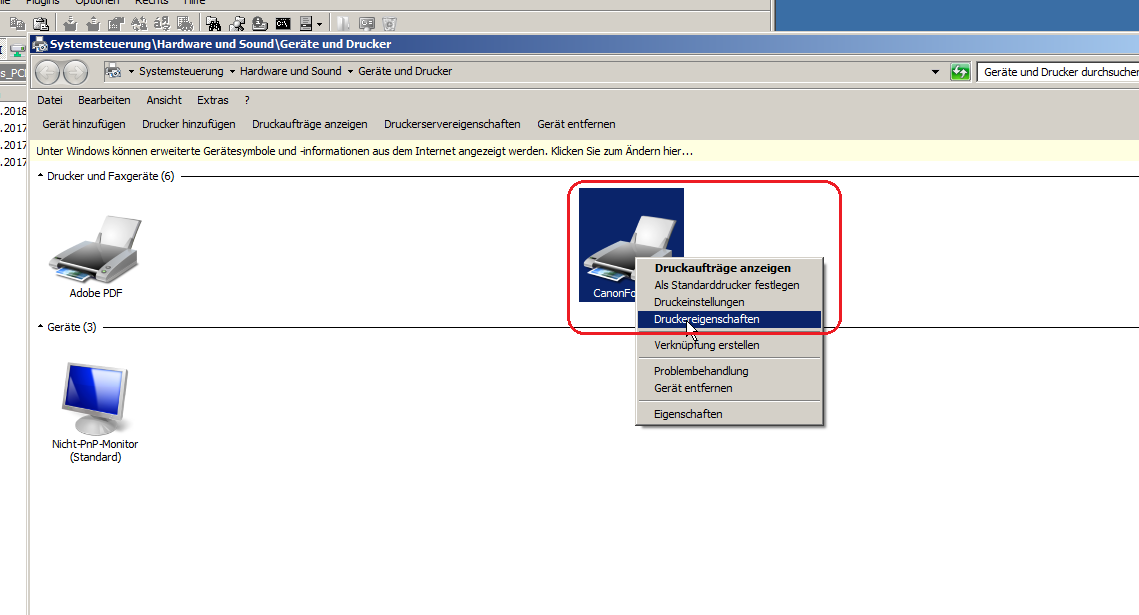
Step 15: Open printer properties
Now you have to set properties on the printer. To do this, right-click on the newly set up printer "CanonFollowMe" in the overview of your "Devices and Printers" and select "Printer Properties".
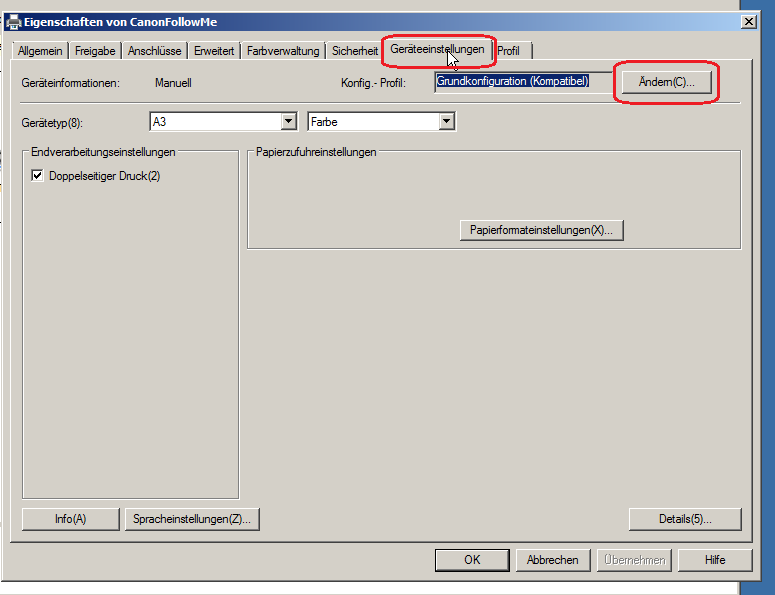
Step 16: Select device settings
Select the "Device Settings" tab and then click "Change" on the "Config Profile" tab.
Step 17: Set configuration profile
Select that you want the "Select manually" configuration profile. Then select "iR-ADV" from the list and specify that the device information should not be retrieved. Then confirm the window with "OK".

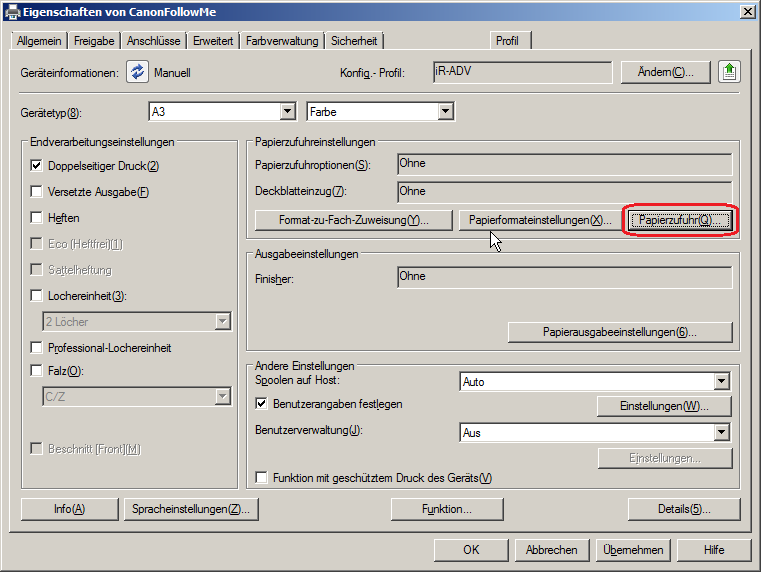
Step 18: Select paper source
Click the "Paper feed (Q)..." button.
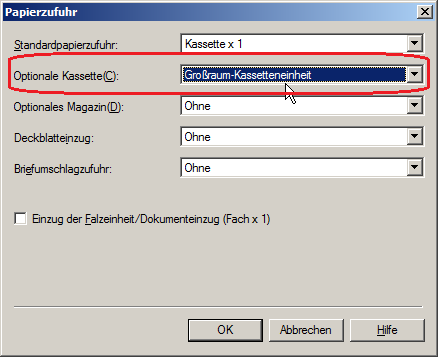
Step 19: Optional cartridge
Select "Large capacity cartridge unit" from the list in the menu item "Optional cartridge" and confirm with "OK".
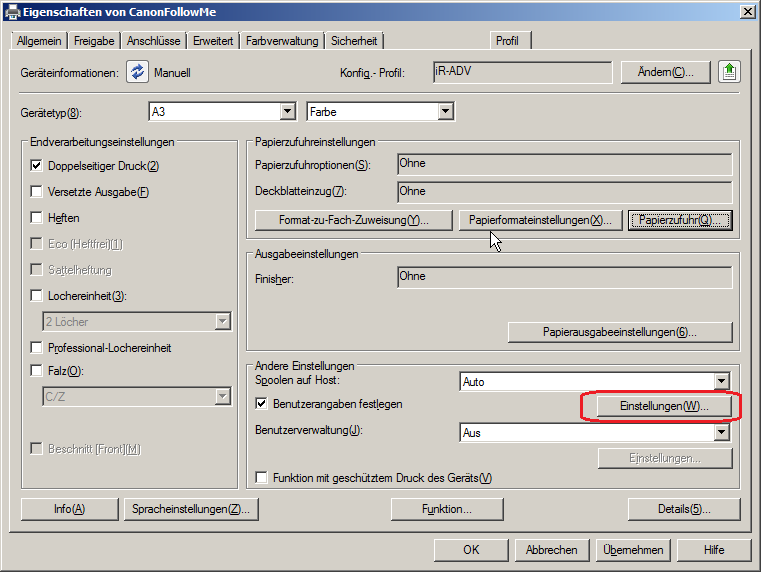
Step 20: Set user name
Select "Settings(W)..." in the "Specify user information" entry.
Step 21: Request user data
Select the three lower checkmarks and confirm with "OK".
Then confirm the window with the device settings, also with "OK", to finally save the settings.
Note for administrators who want to distribute the printer driver to several PCs:
Unfortunately, the three named check marks are not stored in the printer driver, but directly on the person in the Windows registry and must therefore be distributed to each user at the Windows login via a different route. The following registry entries are important for this:
[HKEY_CURRENT_USER\SOFTWARE\Canon\PCL6\CanonFollowMe\Secured]
"ConfirmUserInfo"=dword:00000001
"ConfirmUserName"=dword:00000001
"UseLastSetting"=dword:00000001

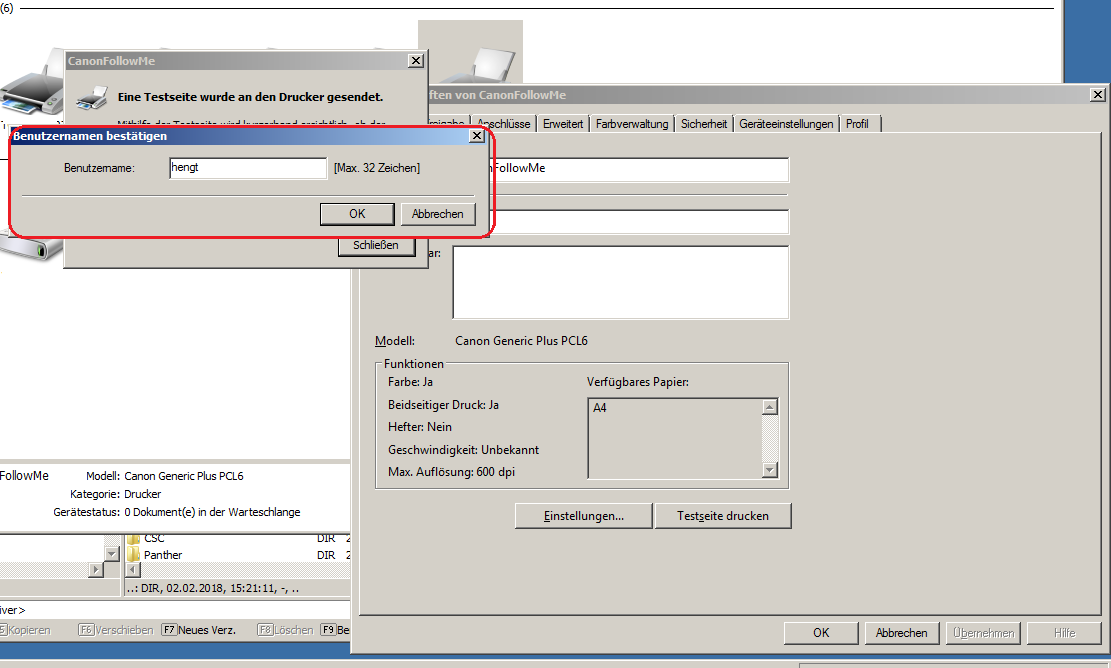
Step 22: Print test page
Your printer is now fully configured. You can now send a test page to the device. Please note that you will be asked for a "user name" when sending the print job. IMPORTANT: This is not your HTW account name! There is a separate user name for the printer environment, which is directly connected to your HTW StudentCard or employee copy card. How to find out your printer user name is explained in this manual.